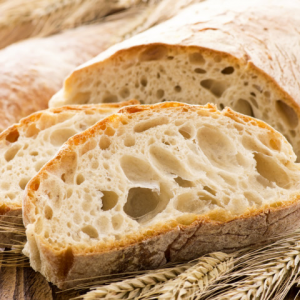
I’ve been making bread more often now that I’m staying home more. We made pizza the other night using Bobby Flay’s recipe for the dough. It came out like real pizza. Better, even. I’ll share below a recipe I’ve been using for ciabatta bread, but the main purpose of this post is to extol the virtues of the right equipment.
I’ve been stumbling along, making bread, pizza, cakes, and other items using the same basic equipment I’ve used for years, despite recipes mentioning exotica like pizza slides, pastry scrapers, and baking stones. I mean, a pizza slide sounds like something you’d find in an amusement park for food fetishists, right?
Well, it turns out these relatively inexpensive items can make a huge difference. For one thing, they make necessary tasks easier. Because they make these tasks easier, you get better results.
Let’s start with a pizza slide. It looks like this ginormous spatula. You slip it underneath your prepared pizza and use it to place your pizza in the oven. Later, you use it to remove your cooked pizza from the oven. I use if for my ciabatta bread and rolls, too. It’s amazing. Of course, it works even better if your dough is sitting on parchment paper. Then you slip the pizza slide underneath the parchment paper and put the dough and paper both in the oven. Parchment paper won’t catch on fire–don’t use waxed paper unless you want to set your house on fire!–and it provides some stability as you slip the pizza or bread in and out of the oven. Here’s the pizza slide I bought on Amazon.
The next thing is a pastry scraper. Sounds like something you’d use on a windshield, right? Except that it’s exactly the right tool for working with dough, whether it’s bread dough or pastry dough. You can even use it to cut
your cooked pizza dough. It’s inexpensive, and every serious or even semi-serious kitchen should have one. Here’s the one I got.
The last item is a baking stone. I got this one reluctantly. I’d been using an upside-down cookie sheet to make pizzas, rolls, and free-form breads like ciabatta bread. I eventually bought a stone, then wondered where to store the blasted thing. Turns out, you can store it on the bottom rack of your oven. It can even improve your oven’s performance in unexpected ways. When you pre-heat your oven, you’re also heating the stone. When you open your oven, for example to put something in it to cook, hot air escapes and the oven temperature drops, sometimes by a lot depending on how long you keep your oven open. But with the stone in there, it stays hot and so your oven recovers much faster when you open and close the door. The stone can even help in making the heat distribute through your oven more evenly. So there are pluses just to storing the stone in your oven. But best of all is they way the stone improves things like pizzas and free-form breads like ciabatta. Because they retain heat and so are hot when you put the bread or pizza on them, you get a much crisper and not gooey bottom crust. They do tend to be a bit more expensive than the other two items, but I think the one I bought was well worth it.
On to our recipe. Ciabatta bread recipes all call for making a preferment. This is exactly what it sounds like: you mix some liquid, yeast, and flour together ahead of time, usually the day before, i.e., you “pre-ferment” this part of the dough. The yeast in the preferment has already started its magic, and so it helps with the fermenting process in the final dough. Depending on the recipe, this will be called a sponge, a biga, a poolish, or a pâte fermentée. I like “sponge” because the preferment dough kind of sponge-like.
Some recipes will make a big deal about the difference between the names of the pre-fermented dough, distinguishing between how stiff it is, i.e., how much liquid is in the bit of dough that you prepare the day before. According to research I’ve read, it’s the total amount of liquid in the final dough that matters, not how wet or stiff the pre-fermented dough is.
For the recipe below, I’ve used my KitchenAid stand mixer to knead the dough. This is another of those bits of equipment that I now regard as indispensable. My GE oven has useful feature, too. In addition to a conventional convection oven where I’ll bake the bread, it has a “speed” oven that doubles as a microwave, a second conventional convection oven, and as a “speed” oven that cooks with both microwaves and heat for quicker results. One of the features of this “speed” oven is that it has a setting for proofing dough that works like a charm. The “speed cooking” feature isn’t as useful as I’d hoped since there are so few recipes available, but I like the flexibility it provides.

Ciabatta Bread
Equipment
- Stand mixer, baking stone, water spritzer
Ingredients
Sponge
- 1/2 C Water
- 1/2 tsp Active yeast
- 1 C Flour Bread flour is better, but general flour is fine
Ciabatta
- 2 C water
- 2 TBSP water
- 1 TSP Active yeast
- 2 TSP Salt
- 4 C Flour Bread flour is better, but general flour is fine
Instructions
Sponge
- Disolve the yeast in warm water (110F) in a mixing bowl
- Add the flour. Beat with a wooden spoon for about fifty strokes to mix the flour, water, and yeast.
- Cover with plastic wrap and let sit overnight at room temperature.
Ciabatta
- Add one cup of water to the Sponge--this is to make it easier to transfer the sponge to the bowl of your stand mixer. The sponge should be bubbly after sitting overnight.
- Using a spatula, scrape the sponge into the bowl of your stand mixer.
- Add the flour, yeast, and salt, and remaining 1C+2TBSP of water to the stand mixer.
- With the paddle attachment, mix the ingredients at low speed for a minute or so until well-combined.
- After the dough is mixed, change to the dough hook for your mixer. At speed 5, knead the dough for approximately 15 minutes. Watch your mixer since at this speed it will tend to "walk" on the counter. At roughly the mid-point, the dough will begin to clean the sides of bowl.
- While kneading the dough, prepare the bowl where the dough will rise by greasing it with a thin coat of Crisco or olive oil.
- When you're done kneading, the dough will look glossy and slump back into the bowl. This is expected. Transfer the dough to the prepared bowl, cover, and let rise for 2-3 hours until it's tripled in bulk.
- When the dough is done rising, dust your work surface with flour, and lay out two sheets of parchment paper nearby for the loaves or rolls. Brush your hands with flour and scoop the dough out of the bowl and onto the work surface, taking care to avoid deflating it.
- Cut the dough into two pieces for loaves or 16 pieces for rolls. Using your hands--dusting with flour as needed-- shape into loaves or rolls and then place the loaves and/or rolls onto the parchment paper. Let rest for 20-30 minutes. The dough will rise a bit during this time, but will take off when you place it in the oven.
- While the dough is resting, preheat the oven to 475F. Be sure to have your baking stone or an inverted cookie sheet in your oven while it's heating so the cooking surface for the bread is hot when the loaves or rolls go in.
- Affter the 20-30 minutes have elapsed and the oven is at temperature, spritz the tops of the loaves or rolls with a light coating of water. This will help develop a crisp crust. Slide the loaves onto your baking stone (or inverted cookie sheet if you don't have a stone).
- Bake for 20-30 minutes until puffed and golden brown. You can spritz them one more time with water if you want crispier crust.
- Cool on wire racks for 10 minutes before cutting.


